DIY Knock Sensor Replacement Made Easy
You might wonder if you can swap out a knock sensor by yourself. Good news—you probably can, especially if you enjoy getting hands-on with your car. The job can get tricky, so you want to make sure you have the right tools and always keep safety in mind. Before you pull the trigger at your local knock sensor buy store, double-check that the sensor is really the issue.
Can You Replace a Knock Sensor?
DIY or Mechanic?
You might ask yourself, “Should I try this at home or call a mechanic?” The answer depends on a few things. If you have some experience fixing cars, you might feel ready to tackle a knock sensor replacement.
If you have never worked under the hood, you could find this job a bit tough. Some knock sensors hide under the intake manifold or deep in the engine bay. This means you may need to remove other parts just to reach it.
Tip: If your knock sensor sits in a hard-to-reach spot, or if you feel unsure, it’s okay to let a pro handle it. Mechanics have the right tools and know-how to get the job done safely.
Let’s talk about cost. Doing it yourself can save you money. Mechanics usually charge between $150 and $400 for this repair. When you do it yourself, you only pay for the part. But remember, professional service often comes with a warranty and peace of mind.
Skill and Tools Needed
It is not necessary to be a master mechanic, only some comfort with basic hand tools is enough. A ratchet and socket set with a 1 and 1/16 inch or 27mm socket will be required. Wrenches and screwdrivers are part of the job. Both needle nose and regular pliers are helpful. A torque wrench is needed for proper tightening. Extensions and adapters make work easier in tight spaces. A service manual or a trusted online guide gives clear steps for the exact car model. Before starting, make sure the battery can be disconnected safely and each step is followed with care.
Note: If you don’t have the right tools or feel nervous about the process, it’s smart to ask for help. Some jobs are easier with a friend or a mechanic by your side.
Replacing a knock sensor takes patience and care. If you feel confident and prepared, you can do it yourself!
You may also be interested in:How to Replace an LR44 Battery Safely - Quick DIY Fix
Knock Sensor Symptoms

Image Source: pexels
Warning Signs
When the knock sensor begins to fail, the car often shows clear signs. The check engine light may turn on first, as the computer detects a problem. A metallic pinging or knocking noise from the engine can appear, especially during acceleration or when driving uphill. The engine may feel weak or sluggish, sometimes hard to start, and it may not run as smoothly as before. Ignoring these signs can lead to more fuel use, power loss, or even damage. The knock sensor protects the engine by sending signals to adjust timing, and without it the car cannot perform well.
Confirming the Problem
It is not always possible to know if the knock sensor is failing just by listening or looking. A few checks can confirm the problem. An OBD-II scanner can be plugged into most cars made after 1996, and codes like P0325 often show a knock sensor fault. The sensor and its wires should be checked for cracks, corrosion, or loose connections. Knocking sounds from the engine can also point to failure. In some cases, a mechanic uses a multimeter or an oscilloscopeto test the signal, sometimes tapping the engine block to see if readings change. A knock sensor usually lasts between 100,000 and 150,000 miles, but once trouble codes or symptoms appear, it is best to repair the issue soon. Delaying the fix can cause more serious engine problems.
Knock Sensor Replacement Steps

Image Source: pexels
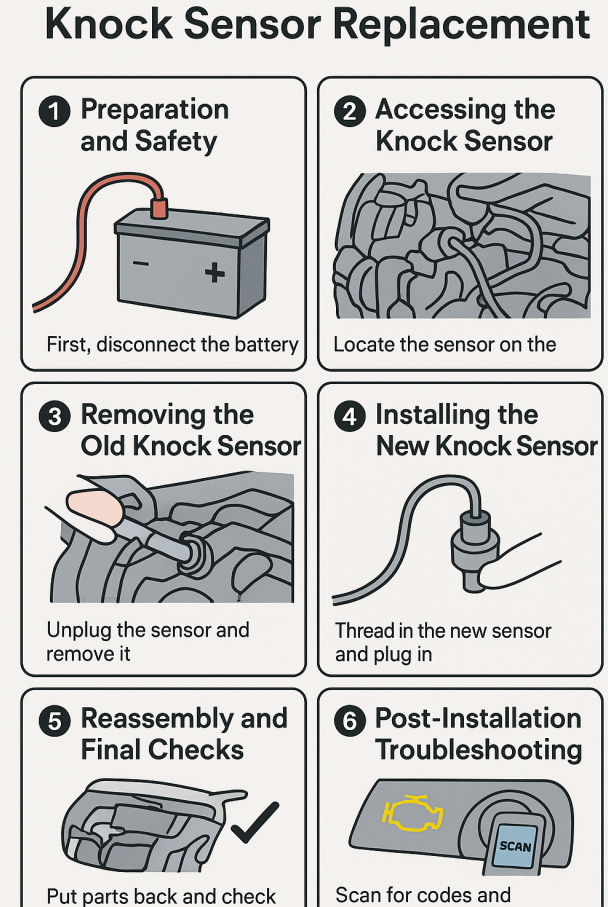
Preparation and Safety for Knock Sensor Replacement
First, disconnect the negative battery terminal to cut power and protect the car’s electronics. Work on a cool engine to avoid burns. Take a clear photo of the knock sensor and its wiring to use later when putting parts back. Gather the tools and the new sensor. Check that the new sensor matches the old one. Handle the sensor and wires with care so they do not bend or pull. If the battery is left connected, it can cause shock or damage to the car’s computer, so always disconnect power first.
Accessing the Knock Sensor on the Engine
The knock sensor location depends on the car model. It may be on top of the engine, under the intake manifold, or deep in the engine bay. You may need to remove the air intake, engine covers, or intake manifold to reach it. In some cars the sensor sits low, so you need to work under the car. If wires or harnesses look damaged, repair or replace them. The job can take one hour or several hours, depending on how hidden the sensor is. If space is very tight or the sensor is hard to reach, ask a mechanic for help.
Removing the Old Knock Sensor
When the sensor is reachable, unplug the electrical connector. Be gentle with the locking tabs. Use the right socket, often 1 and 1/16 inch or 27 mm, to loosen the sensor bolt. If the bolt is stuck, use a breaker bar or an impact tool. Turn the sensor counterclockwise and remove it slowly to avoid breaking the bolt. If the bolt breaks and cannot be removed, mount the new sensor nearby or get professional help to remove the broken bolt. Work slowly to avoid broken bolts or damaged wires.
Installing the New Knock Sensor
Make sure the new sensor matches the old one before installing. Thread the sensor in by hand first to avoid cross-threading. Tighten the sensor with a torque wrench to the car maker’s spec. Many sensors need medium torque, often 15 to 23 ft-lb. Check the service manual for the exact value. Do not use grease or extra washers on the sensor, because they can change the readings. Plug the connector back in until it clicks. Do not bend or pinch the wires. Over-tightening can strip threads or break the sensor, so use a torque wrench when possible.
Reassembly and Final Checks
Put back any parts you removed, such as the intake manifold or air intake. Check all connectors to make sure they lock and fit tight. Seal any holes to keep out dirt and water. Reconnect the battery. Start the engine and listen for normal sound and no knocking. Take a short test drive so the computer can relearn and confirm the new sensor works. If you have a scan tool, clear codes and scan again to make sure no new codes show up. If the check engine light comes back or the engine runs poorly, check connectors and wiring again before thinking the new sensor is bad.
Post-Installation Troubleshooting for Persistent Codes
If codes stay after replacement, check the wiring harness and connector for damage or corrosion. Make sure the sensor sits flat and is torqued to spec. Dirt or wrong torque can cause bad readings. Sometimes the computer may need a software update or reset. Bad terminals or a bad ECM can also keep codes active. Use a scan tool to watch live sensor data and see if the ECU shows normal voltage or frequency changes.
Wiring Issues and Repair Steps
Wiring problems are a common cause of knock sensor codes. Start with an OBD-II scan to see codes like P0325 or P0330. Check the sensor wiring for cuts, frays, corrosion, or loose pins. Test with a multimeter for continuity and resistance. Good wires show very low resistance and no short to ground. Replace damaged wiring with the same gauge and correct connectors. After fixing wiring, reset the ECU and scan again. If the wiring runs deep in the engine bay or you are not sure about the repair, let a qualified technician do the work.
When to Seek Help
Sometimes, you do everything right but the problem sticks around. Here’s a quick table to help you know when it’s time to call a mechanic:
If you see any of these signs, don’t stress. A professional can track down tricky wiring problems or update your car’s computer. Sometimes, a little expert help saves you time and keeps your car running strong.
You can tackle a knock sensor replacement if you feel ready and have the right tools. Always start with a proper diagnosis using an OBD-II scanner and a careful inspection.
Stay safe by disconnecting the battery and double-checking your work. If you run into trouble or the sensor is hard to reach, calling a pro makes sense. Learning these skills helps you protect your engine and keeps your car running strong for years.
FAQ
How long does it take to replace a knock sensor?
Most jobs take between 1 and 4 hours. If your sensor sits under the intake manifold, you might need more time. Some cars make the job much easier than others.
Can I drive with a bad knock sensor?
You can drive for a short time, but it’s risky. Your engine may knock or lose power. You could damage your engine if you wait too long.
What tools do I need for this job?
You need a ratchet, socket set, torque wrench, and screwdrivers. Some cars need special tools. Always check your car’s manual before you start.
Will the check engine light turn off after I replace the sensor?
Usually, yes! Sometimes, you need to clear the code with an OBD-II scanner. If the light stays on, double-check your work or scan for new codes.


